
Deploying on Kubernetes#
Overview#
Dagster publishes a fully-featured Helm chart to manage installing and running a production-grade Kubernetes deployment of Dagster. For each Dagster component in the chart, Dagster publishes a corresponding Docker image on DockerHub.
Helm is package manager for Kubernetes applications where users can customize the configuration of created Kubernetes resources via
a values file or command-line overrides, both of which
will be used in this guide. References to values.yaml in the following sections refer to Dagster's values.yaml.
For users who do not use Helm, this guide is still a useful reference for the components required.
In the Default Deployment section, we go over the simplest way to get started:
In the Advanced Deployment section, we build off of the Default Deployment and add more sophisticated features including solid-level isolation and queuing mechanisms.
- Advanced Quickstart: Running Dagster in Production →
- Advanced Architecture and Walkthrough →
- Advanced Components →
- Helm Configuration Options →
Last, we include sections on:
Default Deployment#
In this section, we cover the simplest deployment option from quickstart, to architecture, to individual components.
Default Quickstart#
The following steps are how to get up and running with the default architecture. This example requires a Kubernetes cluster.
Step 1: Set up environment
Make sure kubectl is configured with the intended Kubernetes cluster.
Step 2: Build Docker image for User Code
Skip this step if using Dagster's example User Code image dagster/k8s-example.
Create a Docker image containing the repository and any dependencies needed to execute the objects in the repository. For reference, here is an example Dockerfile and the corresponding User Code directory.
Step 3: Push Docker Image to registry
Skip this step if using Dagster's example User Code image.
Publish the image from Step 2 to a registry that is accessible from the Kubernetes cluster, such as AWS ECR or DockerHub.
Step 4: Add Docker Image to Helm
Update the userDeployments.deployments section of values.yaml to include your deployment.
The following snippet works for Dagster's example User Code image.
userDeployments:
  enabled: true
  deployments:
    - name: "k8s-example-user-code-1"
      image:
        repository: "dagster/k8s-example"
        tag: latest
        pullPolicy: Always
      dagsterApiGrpcArgs:
        - "-f"
        - "/example_project/example_repo/repo.py"
      port: 3030
The dagsterApiGrpcArgs field expects a list of arguments for dagster api grpc which is run upon Deployment creation and
starts the gRPC server. To find the applicable arguments, read here.
Step 5: Install on Kubernetes cluster
Install the Helm chart and create a release. Below, we've named our release dagster-release.
We use helm upgrade --install to create the release if it does not exist; otherwise, the
existing dagster-release will be modified:
helm repo add dagster https://dagster-io.github.io/helm
helm upgrade --install dagster-release dagster/dagster -f /path/to/values.yaml
Helm will launch several pods including PostgreSQL. You can check the status of the installation with kubectl.
If everything worked correctly, you should see output like the following:
$ kubectl get pods
NAME                                              READY   STATUS    RESTARTS   AGE
dagster-dagit-645b7d59f8-6lwxh                    1/1     Running   0          11m
dagster-k8s-example-user-code-1-88764b4f4-ds7tn   1/1     Running   0          9m24s
dagster-postgresql-0                              1/1     Running   0          17m
Step 6: Open Dagit and run a pipeline!
Start port forwarding to the Dagit pod via:
export DAGIT_POD_NAME=$(kubectl get pods --namespace default \
-l "app.kubernetes.io/name=dagster,app.kubernetes.io/instance=dagster,component=dagit" \
-o jsonpath="{.items[0].metadata.name}")
echo "Visit http://127.0.0.1:8080 to open Dagit"
kubectl --namespace default port-forward $DAGIT_POD_NAME 8080:80
Visit http://127.0.0.1:8080, navigate to the playground,
select the default preset, and click Launch Execution.
You can introspect the jobs that were launched with kubectl:
$ kubectl get jobs
NAME                                               COMPLETIONS   DURATION   AGE
dagster-run-c8f4e3c2-0915-4317-a168-bf8c86810fb2   1/1           4s         6s
Within Dagit, you can watch pipeline progress live update and succeed!
Default Architecture#
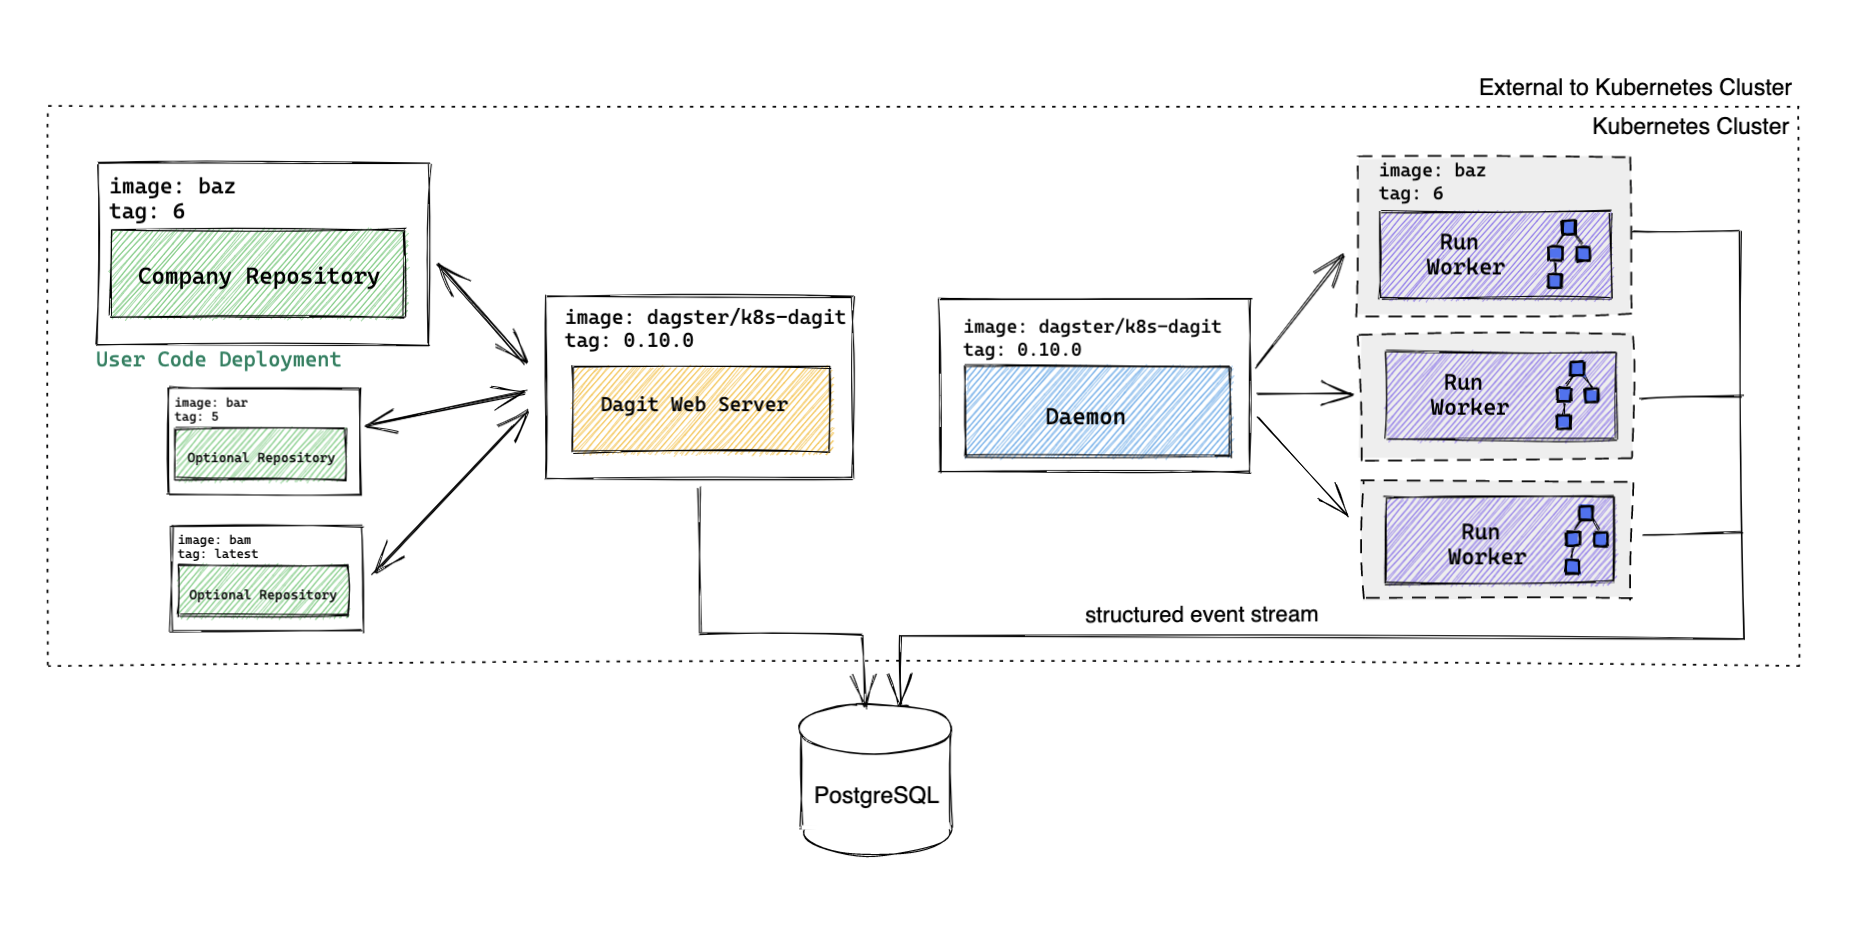
Default Walkthrough#
After a user clicks Launch Execution in Dagit,
- Dagit sends a gRPC request to the User Code Deployment to fetch the current image
company_repository/baz:6that the User Code Deployment is running. - Dagit creates a Pipeline Run entry in the PostgreSQL Runs table with
company_repository/baz:6recorded as the image to be used. - The Daemon checks for any runs that are ready to be executed, finds the Pipeline Run from (2), and spins up a Run Worker
(an ephemeral Kubernetes Job) with image
company_repository/baz:6. - The Run Worker traverses the execution plan (executing each solid in the pipeline in topological order) and writes structured events back to PostgreSQL.
Each of these steps is visible in Dagit.
Default Components#
| Component Name | Type | Image |
|---|---|---|
| Daemon | Deployment | dagster/k8s-dagit (released weekly) |
| Dagit | Deployment behind a Service | dagster/k8s-dagit (released weekly) |
| Database | PostgreSQL | postgres (Optional) |
| Run Worker | Job | User-provided or dagster/k8s-example (released weekly) |
| User Code Deployment | Deployment behind a Service | User-provided or dagster/k8s-example (released weekly) |
Daemon#
The daemon periodically checks the Runs table in PostgreSQL for Pipeline Runs in that are ready to be launched. The daemon also runs the dagster-native scheduler, which has exactly-once guarantees.
The Daemon launches the run via the K8sRunLauncher, creating a Run Worker
Job with the
image specified used in the User Code Deployment.
Dagit#
The Dagit webserver communicates with the User Code Deployments via gRPC to fetch information needed to populate the Dagit UI. Dagit does not load or execute user-written code to ensure robustness, and will remain available even when user code contains errors. Dagit frequently checks whether the User Code Deployment has been updated; and if so, the new information is fetched.
Dagit can be horizontally scaled by setting the dagit.replicaCount field in the values.yaml.
By default, it is configured with a K8sRunLauncher, which
creates a new Kubernetes Job per pipeline run.
Database#
The user can connect an external database (i.e. using a cloud provider's managed database service, like RDS) or run PostgreSQL on Kubernetes. This database stores Pipeline Runs, Events, Schedules, etc and powers much of the real-time and historical data visible in Dagit. In order to maintain a referenceable history of events, we recommend connecting an external database for most use cases.
Run Worker#
The Run Worker is responsible for executing the solids in topological order. The Run Worker uses the same image as the User Code Deployment at the time the run was requested. The Run Worker uses ephemeral compute, and completes once the run is finished. Events that occur during the run are written to the database, and are displayed in Dagit.
The Run Worker jobs and pods are not automatically deleted so that users are able to inspect results. It is up to the user to delete old jobs and pods after noting their status.
User Code Deployment#
A User Code Deployment runs a gRPC server and responds to Dagit's requests for information (such as: "List all of the pipelines in each repository" or "What is the dependency structure of pipeline X?"). The user-provided image for the User Code Deployment must contain a repository definition and all of the packages needed to execute pipelines / schedules / sensors / etc within the repository.
Users can have multiple User Code Deployments. A common pattern is for each User Code Deployment to correspond to a different repository.
This component can be updated independently from other Dagster components, including Dagit. As a result, updates to repositories can occur without causing downtime to any other repository or to Dagit. After updating, if there is an error with any repository, an error is surfaced for that repository within Dagit; all other repositories and Dagit will still operate normally.
Advanced Deployment#
In this section, we build off of the Default Deployment and add more sophisticated features.
Advanced Quickstart#
The following steps set up the advanced architecture. This example requires a Kubernetes cluster and a persistent file store (we use S3 in the example). Read about GCP documentation here.
Step 1-4: Follow Step 1-4 in the Default Quickstart
Step 5: Configure Persistent Object Storage
Configure persistent object storage so that data can be serialized and passed between steps. To run the Dagster User Code example, create a S3 bucket named "dagster-test" (this can be customized in Step 7).
To enable Dagster to connect to S3, provide AWS_ACCESS_KEY_ID and AWS_SECRET_ACCESS_KEY environment variables via the env, envConfigMaps, or envSecrets
fields under userDeployments in values.yaml or (not recommended) by setting these variables directly in the User Code Deployment image.
Step 6: Install on Kubernetes cluster
Install the Helm chart and create a release. Below, we've named our release dagster-release.
We use helm upgrade --install to create the release if it does not exist; otherwise, the
existing dagster-release will be modified:
helm repo add dagster https://dagster-io.github.io/helm
helm upgrade --install dagster-release dagster/dagster -f /path/to/values.yaml \
--set runLauncher.type=CeleryK8sRunLauncher \
--set dagsterDaemon.queuedRunCoordinator.enabled=true \
--set rabbitmq.enabled=true
Helm will launch several pods. You can check the status of the installation with kubectl.
If everything worked correctly, you should see output like the following:
$ kubectl get pods
NAME                                                     READY   STATUS      RESTARTS   AGE
dagster-celery-workers-74886cfbfb-m9cbc                  1/1     Running     1          3m42s
dagster-daemon-68c4b8d68d-vvpls                          1/1     Running     1          3m42s
dagster-dagit-69974dd75b-5m8gg                           1/1     Running     0          3m42s
dagster-k8s-example-user-code-1-88764b4f4-25mbd          1/1     Running     0          3m42s
dagster-postgresql-0                                     1/1     Running     0          3m42s
dagster-rabbitmq-0                                       1/1     Running     0          3m42s
Step 7: Open Dagit and run a pipeline!
Start port forwarding to the Dagit pod via:
export DAGIT_POD_NAME=$(kubectl get pods --namespace default -l "app.kubernetes.io/name=dagster,app.kubernetes.io/instance=dagster,component=dagit" -o jsonpath="{.items[0].metadata.name}")
echo "Visit http://127.0.0.1:8080 to open Dagit"
kubectl --namespace default port-forward $DAGIT_POD_NAME 8080:80
Visit http://127.0.0.1:8080, navigate to the playground,
select the celery_k8s preset. Notice how intermediate_storage.s3.config.s3_bucket is set to dagster-test; user can replace this string with
any other accessible S3 bucket. Then, click Launch Execution.
You can introspect the jobs that were launched with kubectl:
$ kubectl get jobs
NAME                                               COMPLETIONS   DURATION   AGE
dagster-job-9f5c92d1216f636e0d33877560818840       1/1           5s         12s
dagster-job-a1063317b9aac91f42ca9eacec551b6f       1/1           12s        34s
dagster-run-fb6822e5-bf43-476f-9e6c-6f9896cf3fb8   1/1           37s        37s
dagster-job- entries correspond to Step Jobs and dagster-run- entries correspond to Run Workers.
Within Dagit, you can watch pipeline progress live update and succeed!
Advanced Architecture#
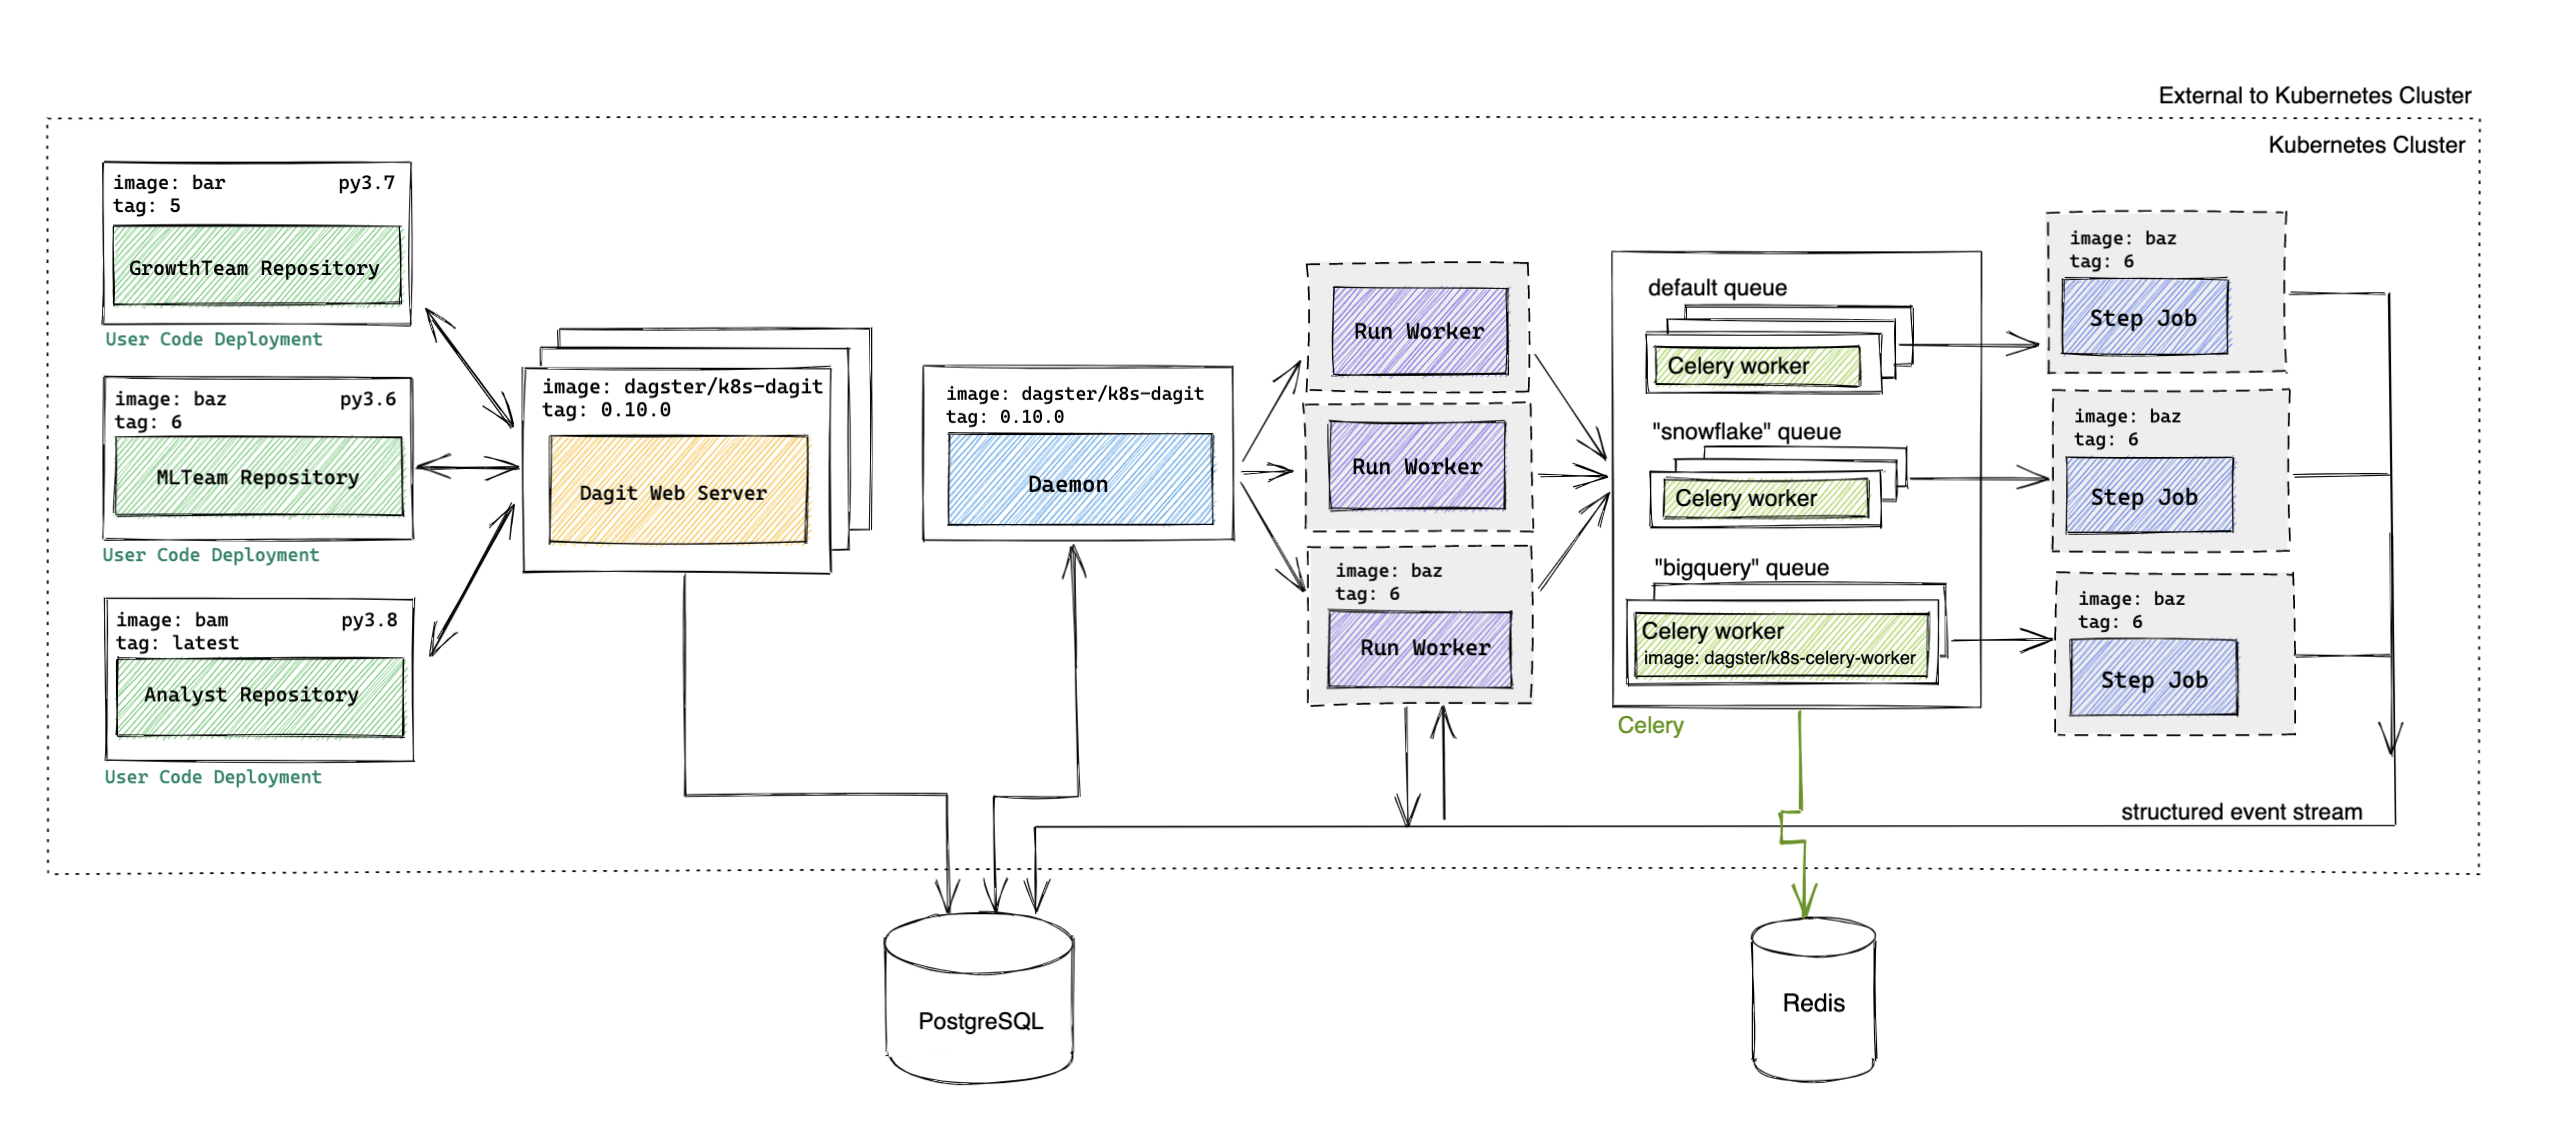
Advanced Walkthrough#
After a user clicks Launch Execution in Dagit,
- [same as default] Dagit sends a gRPC request to the User Code Deployment to fetch the current image
ml_team_repository/baz:6that the User Code Deployment is running. - Dagit creates a Pipeline Run entry with an ENQUEUED state in the the PostgreSQL Runs table with
ml_team_repository/baz:6recorded as the image to be used. - [same as default] The Daemon periodically checks for all runs that are ready to be executed.
- The Daemon finds the enqueued pipeline run and then checks whether there is capacity to launch a new run. If so,
the Daemon creates an ephemeral Run Worker (Kubernetes Job) with image
ml_team_repository/baz:6. - The Run Worker traverses the execution plan, sending steps that are ready to execute to the configured Celery queue as a Celery task and waiting for completion of previously sent steps.
- The Celery worker picks tasks off the queue, creates an ephemeral Step Job (Kubernetes Job) with image
ml_team_repository/baz:6to execute the step, and waits for completion. (Note how imageml_team_repository/baz:6is used for every step associated with the pipeline run.) The Celery Worker sends the result back to the Run Worker, which incorporates the result into the execution plan. - Steps 5 + 6 continue until all executable steps in the Pipeline Run are complete.
Each of these steps is visible in Dagit.
Advanced Components#
| Component Name | Type | Image |
|---|---|---|
| Celery | Deployment | dagster/k8s-celery-worker (released weekly) |
| Daemon | Deployment | dagster/k8s-dagit (released weekly) |
| Dagit | Deployment behind a Service | dagster/k8s-dagit (released weekly) |
| Database | PostgreSQL | postgres (Optional) |
| Flower (Optional) | Deployment behind a Service | mher/flower |
| Run Worker | Job | User-provided or dagster/k8s-example (released weekly) |
| Step Job | Job | User-provided or dagster/k8s-example (released weekly) |
| User Code Deployment | Deployment behind a Service | User-provided or dagster/k8s-example (released weekly) |
Celery#
Celery is a distributed task queue that Dagster uses to enable limiting
the number of concurrent connections to a resource. Users can configure multiple Celery queues (for example, one celery queue
for each resource the user would like to limit) and multiple Celery workers per queue via the
runLauncher.config.celeryK8sRunLauncher.workerQueues section of values.yaml.
The Celery workers poll for new Celery tasks and execute each task in order of receipt or priority. The Celery task largely consists of launching an ephemeral Step Job (Kubernetes Job) to execute that step.
Using Celery requires configuring the CeleryK8sRunLauncher and celery_k8s_job_executor (See Configuration).
Daemon#
The Daemon supports sensors, run queues, and schedules. See Daemon overview for more information.
The Daemon launches the run via the CeleryK8sRunLauncher, creating a Run Worker
Job with the
image specified used in the User Code Deployment.
Dagit#
Building off the prior description, but instead, it is configured with the CeleryK8sRunLauncher.
Database#
Same as the prior description.
Flower (Optional)#
Flower is an optional component that can be useful for monitoring Celery queues and workers.
Run Worker#
Building off the prior description, the main difference in this deployment is that the Run Worker submits steps that are ready to be executed to the corresponding Celery queue (instead of executing the step itself). As before, the Run Worker is responsible for traversing the execution plan.
Step Job#
The Step Job is responsible for executing a single step, writing the structured events to the database. The Celery worker polls for the Step Job completion.
User Code Deployment#
Same as the prior description.
Advanced Configuration#
We cover some options that are supported out-of-the-box. We encourage users to write custom Run Launcher and Executor if other execution substrates are used. If you have questions, please reach out to us on Slack!
Run Launcher#
The Run Launcher is responsible for allocating the computational resources for run execution.
K8sRunLauncher \[Default]:The K8sRunLauncher is used in the Default Deployment example. It creates a new Kubernetes Job per pipeline run.
CeleryK8sRunLauncher:The CeleryK8sRunLauncher is used in the Advanced Deployment example. It creates a new Kubernetes Job per step
for step-level isolation and handling concurrency limits on a per-step basis.
Executor#
The Executor traverses the execution plan, enforcing execution order, conditional execution, handling retries, etc.
With the K8sRunLauncher, users can utilize the in_process_executor, the multiprocess_executor,
the celery_executor, the celery_docker_executor,
or a custom Executor.
With the CeleryK8sRunLauncher, user must use the celery_k8s_job_executor.
As seen in the Advanced Deployment example, this creates a Celery task for each Step, allowing for step-level isolation and concurrency control.
Scheduler#
Schedule names are generated by hashing the schedule properties, so different repositories can contain schedules with the same schedule name.
Daemon scheduler [Default]: Uses dagster-native scheduler. The daemon is also responsible for running sensors, and managing the queue of runs. This is used in both the Default Deployment and Advanced Deployment examples and is our recommended approach.
K8s CronJob scheduler [Deprecated]: Uses Kubernetes CronJob directly.
In order to enable the K8sScheduler, set scheduler.type to K8sScheduler in the values.yaml.
When a new schedule is turned on, Dagster creates a corresponding Kubernetes CronJob object. When a schedule is updated, Dagster finds and patches the existing CronJob so that there is no downtime. At execution time, the Kubernetes CronJob will create a Kubernetes Job specifically to instantiate the Run Launcher, which in turn launches the Run Worker Job.
Tools and Tips#
Here are some tools and tips for running in production.
Custom Kubernetes Configuration#
The dagster-k8s/config allows users to pass custom configuration to the Kubernetes Job, Job metadata, JobSpec,
PodSpec, and PodTemplateSpec metadata. Example usage:
  @solid(
    tags = {
      'dagster-k8s/config': {
        'container_config': {
          'resources': {
            'requests': { 'cpu': '250m', 'memory': '64Mi' },
            'limits': { 'cpu': '500m', 'memory': '2560Mi' },
          }
        },
        'pod_template_spec_metadata': {
          'annotations': { "cluster-autoscaler.kubernetes.io/safe-to-evict": "true"}
        },
        'pod_spec_config': {
          'affinity': {
            'nodeAffinity': {
              'requiredDuringSchedulingIgnoredDuringExecution': {
                'nodeSelectorTerms': [{
                  'matchExpressions': [{
                    'key': 'beta.kubernetes.io/os', 'operator': 'In', 'values': ['windows', 'linux'],
                  }]
                }]
              }
            }
          }
        },
      },
    },
  )
  def my_solid(context):
    context.log.info('running')
Celery Queue Configuration#
Users can set “dagster-celery/queue” on solid tags to determine the Celery queue that should be used.
By default, all solids will be sent to the default Celery queue named "dagster". Example usage:
  @solid(
    tags = {
      'dagster-celery/queue': 'snowflake_queue',
    }
  )
  def my_solid(context):
    context.log.info('running')
Celery Priority#
Users can set dagster-celery/run_priority on the pipeline tags to configure the baseline priority of all solids
from that pipeline. Example usage:
  @solid(
    tags = {
      'dagster-celery/run_priority': 3,
    }
  )
  def my_solid(context):
    context.log.info('running')
Users can set dagster-celery/priority on the solid tags to configure the additional priority of any solid.
“dagster-celery/priority”. Example usage:
  @solid(
    tags = {
      'dagster-celery/queue': 'snowflake_queue',
    }
  )
  def my_solid(context):
    context.log.info('running')
When priorities are set on both the pipeline and solid, the sum of both priorities will be used.
Database#
In both deployment examples above, we spin up a PostgreSQL database within a Kubernetes Pod. In a real deployment,
users will likely want to set up an external PostgreSQL database and configure the postgres section of values.yaml
(specifically postgres.enabled: false, postgresqlHost, postgresqlUsername, postgresqlPassword, postgresqlDatabase, service.port).
Celery broker#
In both deployment examples above, we spin up RabbitMQ within a Kubernetes Pod. In a real deployment,
users will likely want to set up an external, like Redis, and configure rabbitmq and redis sections of values.yaml.
To configure an external Redis, set rabbitmq.enabled: false, redis.enabled: false, redis.host, redis.port,
redis.brokerDbNumber, redis.backendDbNumber.
Security#
Users will likely want to permission a ServiceAccount bound to a properly scoped Role to launch Jobs and create other Kubernetes resources.
Users will likely want to use Secrets for managing secure information such as database logins.
Debugging#
This section is meant to contain information that does not exactly fit into other sections, but may be useful during the debugging process. This section is still a work in progress, and we plan to add to it based on user questions.
To debug why the Run Workers / Step Jobs are using the wrong image, one approach is to check the
DAGSTER_CURRENT_IMAGE environment variable in the User Code Deployment pods and confirm that it is what you expect.
Every time the User Code Deployment is re-deployed, we set the DAGSTER_CURRENT_IMAGE environment variable with the image that is
currently running. It should consist of a simple string in the form <image_respository>:<image_tag>. If the image returned
is None, check that the User Code Deployment is up and running.
Overview of the ConfigMaps generated by the Helm chart.
dagster-instance: Defines the Instance YAML for all nodes in the system. Configures Dagster storages to use PostgreSQL, schedules to use cron, and sets the run launcher asCeleryK8sRunLauncherto launch pipeline runs as Kubernetes Jobs.dagster-*-env: Environment variables for Dagit, the Celery workers, and pipeline execution.dagster-celery: Configures the backend/broker which the Celery workers connect to.
As always, we welcome users to reach out to us on Slack.